The upgrade to SOS 2010 is quite similar to previous SOS upgrades that you may have done. It does, however, replace your older Sybase database components with newer versions. In some cases that change will require a couple of post-installation steps, which are detailed below.
All Installations, Including Network Workstations
You may find that one or two obsolete shortcuts remain in your Windows Start > Programs > SOS Applications menu.
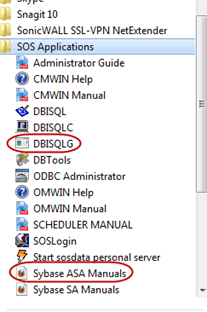
The DBISQLG query utility has been replaced by the new DBISQL (no G at the end). The old program shortcut will no longer work and should be removed from the SOS Applications menu. Similarly, the shortcut to bring up the Sybase documentation now has a slightly different name, Sybase SA Manuals. The old Sybase ASA Manuals shortcuts will no longer work, so that shortcut should also be deleted, to avoid confusion.
To delete a menu shortcut, just right-click the shortcut and then click Delete on the pop-up menu. The two menu entries to be deleted are circled in the figure to the left.
Standalone Computer Installations
In most cases, the installation will make all necessary changes for you, except, possibly, the removal of the now obsolete menu items in the Start > SOS Applications menu.
64 Bit Windows Option
If you are running your software on a 64-bit version of Windows, you can choose to run the 64-bit version of the database engine rather than the default 32-bit version. Although either one will work fine in your environment, if you have more than three GB of RAM in your system, you may experience better performance with the 64-bit engine. Changing from one to the other is quite easy:
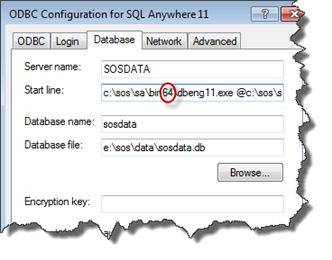
- Select Start > Programs (or All Programs) > SOS Applications > ODBC Administrator.
- Click the System DSN tab.
- Double-click SOSDATA.
- Click the Database tab.
- In the Start line, scroll to the left, so you can see the beginning of the command.
- Replace the number 32 with 64. The command will now start with c:\sos\sa\bin64\dbeng11.exe
- Click OK to save, then OK again to close the ODBC Administrator applet.
The next time you start SOS, the database will start using the 64-bit engine!
Database Servers
Edit the SERVER.PRM File
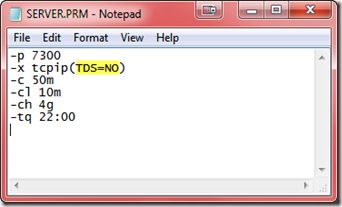
In the old version of the Sybase database engine, the recommended network packet size was 1480 bytes. With the new engine, the default and recommended size is 7300 bytes. For best performance, therefore, SOS recommends that you remove the “-p 1480” parameter from your SERVER.PRM file, or change the “1480” to “7300”. In addition, to close a potential security threat, SOS strongly recommends that you add the parameter “TDS=NO”, in parentheses, after “tcpip”. Here is an example:
Modify all Database Startup Shortcuts
Prior to the 2010 release, the database engine was called DBSRV9.EXE and was located in \SOS\ASA\Win32. The new database engine is named DBSRV11.EXE and is located in \SOS\SA\BIN32, with the 64-bit version located in \SOS\SA\BIN64. As a result, old shortcuts will no longer work and should be deleted. There is a shortcut in Start > All
Programs > SOS Applications to start the new database server, using the 32-bit engine (Start SOSDATA Server). You should delete any left-over shortcuts and create new ones by copying the one in the Start menu:
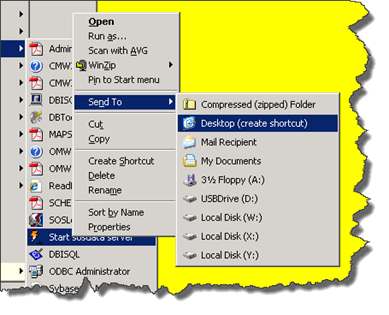
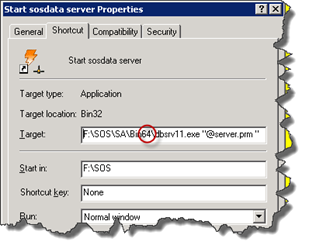
If you are running the database on a 64-bit Windows machine with more than 2 GB of RAM, you will probably see better performance by using the 64 bit engine, so after creating the 32-bit shortcut, just edit its properties as shown below, modifying the Target location from BIN32 to BIN64:
Delete and Re-create the Database Service
You may have been running your database as a windows background service, or perhaps you want to start doing so. The main advantage to running as a service is that the database will start and run whether or not anyone is logged into the server computer’s console. Services created in versions prior to SOS 2010 appear in the Windows Service Manager in the form:
Adaptive Server Anywhere – mysos
where “mysos” is the name you gave to the service when you created it. You must first remove the existing service, if there is one, then create a new one. The new one will appear in the list of services with a name in the form:
SQL Anywhere – mysos
To delete the existing service:
- Open a command window, being careful to use the Run as administrator option if you are working on Vista, Windows 7, or Server 2008. (That is, type CMD in the Start menu Search field, then right-click CMD.EXE in the search results and select “Run as administrator”.)
- Even if you plan to run the 64 bit database engine, change to the \SOS\SA\BIN32 directory:
CD \SOS\SA\BIN32 <enter>
- Assuming that the name of your existing service is “mysos”, delete it with this command:
dbsvc –y –d mysos
To create the new service:
- If you are not already in a command window running with Administrator rights, follow steps one and two above.
- Now create the new service with the following command. The options in this example will set the service to run under the system account (-sa), as a network service (-t network), to start automatically (-s auto), to display the database icon in the system tray (-i), and to be named “mysos” (-w mysos). It will appear in the Windows Services Manager as “SQL Anywhere – mysos”. If you are running the database in 64-bit Windows, using the 64-bit option is recommended, but either version of the engine will work. The 64-bit engine often provides better performance, especially for larger databases. If you are running in 32-bit Windows, you MUST use the 32-bit command. These commands would be typed on a single line, of course. Note that the -i option to display the icon in the system tray won’t work on Vista, 7, or Server 2008 and later, so omit that option if using one of those. Service configuration commands are case sensitive. Type your options exactly as shown (eg: “automatic” will fail but “Automatic” will work). If you still have trouble getting the service created, leave out the “-s Automatic”. You can change the properties to “automatic” from the Windows Services list after it is created.
32-bit Windows:
dbsvc -as -t Network -s Automatic -i -w mysos c:\sos\sa\bin32\dbsrv11.exe @c:\sos\server.prm c:\sos\data\sosdata.db
64-bit Windows:
dbsvc -as -t Network -s Automatic -i -w mysos c:\sos\sa\bin64\dbsrv11.exe @c:\sos\server.prm c:\sos\data\sosdata.db - After executing the command, you will find a new Windows service listed in Windows’ Administrative Tools > Services applet: SQL Anywhere – mysos. You can adjust the properties for the service just as you would for any other service.
For more detailed discussion and instruction for running SQL Anywhere as a Windows service, see:
http://www.sosoft.com/userdocs/?p=30
Adjust Scheduled Tasks
You may be using one or more Scheduled Tasks in Windows to control starting or stopping your database. Normally stopping the database is handled with a –tq parameter in the SERVER.PRM file, such as:
-tq 22:00
to automatically shut down the database at 10:00 pm, but if running as a service, it is possible that you are using a scheduled NET STOP command to do so. More likely, however, if you check your Windows Scheduled Tasks, you will find a task that starts your database server engine each morning, whether you run it as a foreground task, or as a Windows service.
If you have a task to execute a CMD or BAT file that launches the database, find and edit the batch file, replacing the old c:\sos\asa\win32\dbsrv9.exe with the new c:\sos\sa\bin32\dbsrv11.exe (or c:\sos\sa\bin64\dbsrv11.exe) command.
If you are restarting a service, that service no longer exists, so change the command to start the correct service. For example, you might have scheduled the command:
NET START “Adaptive Server Anywhere – mysos”
which now should be:
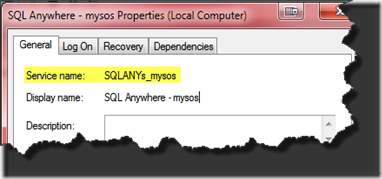
NET START “SQLANYs_mysos”
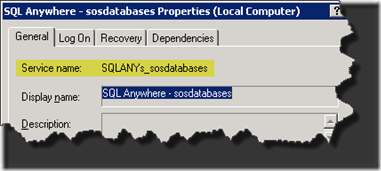
This name, of course, should match the name of the service you created above. Check the properties of the new service in your Control Panel > Administrative Tools > Services to be sure of the name. Once you open the Properties dialog for the service, you will see the service name at the top of the first tab:
Windows Server 2008 / Windows 7 –
Windows Servier 2003 –
Network Workstations
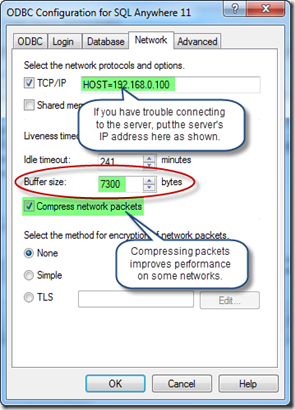
After installing the new version of the software on a network workstation, including a terminal server, check the ODBC settings to be sure that the Buffer Size setting on the Network tab is set to 7300 bytes to match the packet size setting on the server. While on this tab, note that specifying the IP address of your database server in the form HOST=123.123.123.123 (using your own server’s address) is sometimes necessary if the workstation cannot otherwise locate and connect to the database server. Unless you are having a problem, do not specify this parameter. Also on the Network tab is an option to Compress network packets. Using this option can make a significant performance improvement on some networks, but can slow things down on others. If your servers and workstations are relatively speedy, but your network is slow, this option should help. On the other hand, if your server and/or workstations are already working pretty hard, and you have abundant network capacity, checking this option may actually slow things down. You will have to experiment to know for sure. Test by timing the generation of large reports.

 Print Friendly
Leave a Reply
You must be logged in to post a comment.