The 2013 CPT codes must be entered manually in your SOS software. SOS does not provide CPT codes nor does it update your CPT codes list. SOS 2013 does, however, provide a new feature to make adding a new entry to your list of services quick and easy.
If any of the CPT codes that you use are among those changed for 2013, you must use the new CPT codes for all services rendered on January 1st, 2013 and later. if you need to file or re-file any claims prior to January 1st, 2013, however, you will have to submit them with the old codes. For that reason, you probably should retain your old codes and add new, 2013 versions of those codes. To minimize confusion, you might want to hide the old service code entries as soon as you finished entering and submitting claims for 2012 visits. To hide an item, just check the Hide in list option in the lower left corner of the Service window:
How do I enter a new service code?
If you are entering a brand new code that is not replacing one you already have, then you should enter it manually by going to Lookups > Services. and then clicking the Add (green “plus”) icon.
Enter the shorthand code and the description. Remember that the shorthand code and description must be unique, so you cannot use the same shorthand code or description as your old code. If you want to use that code or description for the new service item, you must first change the code and/or description in the old one. If either code or description is exactly the same as an existing entry (whether visible or hidden), an error will prevent you from saving your new entry.
If you are creating a 2013 version of an existing code, especially if the old code has several provider/provider type fees and/or carrier exceptions that you want to use on with the new code:
- Highlight the existing code code in the list.
- Click the “Copy” icon in the toolbar at the top of the window.

- A window will open, prompting you for a new shorthand code and description. Make sure you replace or change the old shorthand code and description
in some way.

- Click on the Blue Check icon to save.
How do I enter “Add-On” codes?
Beginning in 2013, certain types of services require the addition of Add-On codes to provide insurance payors with more detailed information about the service rendered. These Add-On codes are entered as regular service codes.
For example, let’s say that you see a client for “Psychotherapy for 45 minutes with Interactive Complexity”. Prior to January 2013, you would have created a single charge entry, using the service code in your list that designates 90812 as the CPT code. After January 1st, 2013, you would use 90834, which indicates “Psychotherapy 45 minutes”, and a second charge entry for 90785 for “Interactive Complexity”. So prior to January you would have entered one charge for this client with the CPT code 90812. After January 2013 you have to enter two services: one with 90834 and one 90875. Each code has an assigned fee, make sure you verify with your payers to get that information. If you must file the additional code with a fee of zero, then you must be sure to assign the service code to a Service Category (Lookups > Service Categories). If needed, just create a new category which you can name “Zero Fee” or something of the sort, and assign your new Add-On service to that category. OM will always include “include on claims” services that are part of a Service Category on your claims, even if there is no fee for the service. For more information, see Printing Claim Detail Lines When Fee Is Zero.
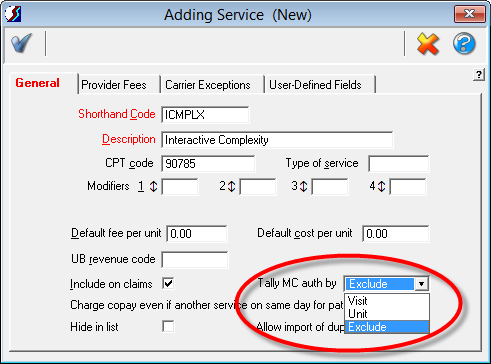
The use of Add-On codes can have the unintended consequence of causing your authorization visit tallies to be incorrect. Both the main and Add-On codes will each be counted, so a single actual visit will reduce SOS’s count of remaining visits by two instead of just one. In the January 31, 2013 update a change was made to the Tally MC Auths by the option on the Service form (Lookups > Services) so that you can now select “Exclude” rather than the prior options of “Visits” and “Units”:
If your practice requires the use of Add-On codes like the one above, you will have to create at least two charge entries for the same date of service. In SOS, the fastest and easiest way to enter two or more related services is through the use of Service Macros.
What is a service macro and how are they entered in OM?
If some of these code combinations will be used frequently in your practice, you will want to use an SOS service macro to make your data entry faster. A service macro is used like a regular service code, but when you save a charge entry in which a macro code is used, SOS will expand it, creating two or more charge entries for you – one for each of the codes that the macro contains. Returning to our example above, we want to enter both a 90834 and a 90735 to describe the service that was rendered, so we will first create a macro that contains both of those service codes.
To enter a Macro:
- Go to Lookups > Services > Add a Macro(the gear with plus sign icon).

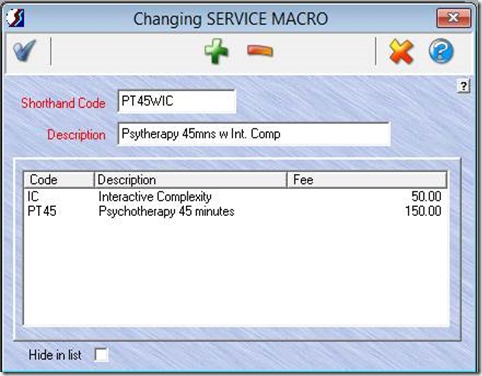
- Once you click Add a Macro, a window will open. Enter a shorthand code and a description, such as “Psychotherapy 45 minutes and Interactive Complexity”.
- Next, click ADD (green “plus” icon) to attach the two service codes that will make up this macro, . Once the two codes are entered it will look like the screen below.
- Click Save (blue “check” icon).
Create macros for all the different code combinations that you will be using. Macros will appear in green in your service code list. You can maintain (change or delete) your macros on click the Macro tab of Lookups > Services.
How do I enter a macro charge in the daysheet?
Still using our example, let’s use our new macro to enter a charge in the daysheet. Start your new charge entry normally, completing all fields as you usually do, except for the Service field. For Service select your new macro from the Services lookup list instead of an individual service code. (If you import your appointments from the Appointment Scheduler or from Case Manager, use the macro code for the service when you enter appointments or progress notes.) Additionally, you cannot enter a fee as you normally do. The screen will show the total of the default fees specified in each service contained in the macro. You will have an opportunity to make changes in the next step. Make sure that you have a value in each of the required (red) fields. You will notice that you will not see any splits in the lower part of the window as you usually do.
When you click Save (blue “check” icon) on the main charge entry screen, a “Changing MACRO” window will appear, showing the way the macro will be expanded, with one line for each daysheet entry it will create. If you want to change the provider, fee, units, or other values for any of these about-to-be-created charges, this is your opportunity to do so. Just double-click the item you want to change (or highlight the item and click the Change icon (“pencil”) in the toolbar. When you have completed any desired changes, proceed by clicking Save (the “check” icon).
Below you can see the result: one charge for 90834 and another for 90735.


 Print Friendly
When entering charges with the service macros, how do you or is there an easier way to apply any payments (i.e. copays) to those charges without having to run a report to see what is unapplied?
How is it different from payments for other charges? Remember that the macro is nothing other than a shortcut to add two or more charges to your daysheet. When you view the daysheet you don’t see the macro anywhere — just the charge entries that it created.