The following instructions are for standalone installations, where the application software and the database are on one computer. For server migration, this article should be consulted.
Many practices are finding that their old hardware has become outdated. While those old machines have provided excellent service, they have become too slow, too limited in RAM, and too congested in hard drive space to continue serving well. Making the move to a new machine is not difficult as long as you follow certain steps.
- Install the SOS software on the new computer, using your most recent CD or the appropriate downloaded installer. It should be the same version or newer than the one you are currently using on the old computer. (There is no need to install any earlier CD’s.) If you don’t have a CD for the same version of the software, check to see if there is an installer for your version available on the SOS web site, or call SOS support. If you have a current support contract, the installer for the current release is usually available on the SOS web site. If you must go from SOS 2009 or earlier to a more recent version on the new computer (such as SOS 2009 on the old computer to SOS 2015 on the new computer, you must also upgrade the version of the database engine, making the process more complex. Contact SOS support for guidance.
- Ideally, you should then back up the entire SOS folder on the old computer, including all subfolders. Backing up the entire SOS folder will assure that you will be moving the entire set of files, including any updates or patches that you have downloaded and installed, custom reports, claim files, and any other personal files you may have created and stored there.
- Restore the backup on the new computer. Depending on how you did your backup, your restore will be done differently. If you just copied the files to a DVD or USB drive using Windows Explorer, restoring the files is a simple matter of copying from the DVD or USB drive back to the matching folders on the new computer. If you did a backup using backup software like NovaBackup, then your target for the restore should be the appropriate drive letter on the new computer. The folder information is stored in the backup, and when you restore from your tape or other media, the files will be put back in their original folder locations.IMPORTANT: If you copy files from a DVD or CD using Windows Explorer, the copies on the new computer may all be set to “Read-Only” status. When you have finished copying the files, you should highlight all the files in each of the folders and reset the properties to uncheck the Read-Only setting: Highlight the files, right-click for the context menu, then left-click on Properties. Uncheck the Read-Only box under Attributes.
- If you are moving a standalone installation or a database server installation, and you are putting the SOS folder in a different location (such as on a different drive letter, or placing it within a different folder on the new system), you may have to reset the transaction log file name embedded in the database during a previous database rebuild operation. If you fail to do so, the database will not start. The steps to reset the log file name appear below:
- Open a command prompt window (Start > Run, then enter CMD or COMMAND and click OK).
- Change to the \SOS\DATA folder on the appropriate drive. (Type the drive letter followed by a colon and press <enter>, then type CD \SOS\DATA and press <enter>.) The command prompt should now show the correct drive and path, for example:
C:\SOS\DATA.
- Enter this command (SOS 2010 or later):
\SOS\SA\BIN32\DBLOG -t SOSDATA.LOG SOSDATA.DB
- You should see something like this:

This command removes the hard-coded path from the filename so the database will use the SOSDATA.LOG file in the same directory as the database files.
- Go into SOS on the new computer to make sure that the data has transferred correctly. Only after you are certain that the software runs on the new computer and the data is intact should you remove the program from the old computer!
Uninstalling the SOS Software from the old computer.
Once you have confirmed that your new system is working fine and that the data is intact, you must completely remove the SOS applications from your old computer. If you want to backup the entire SOS folder just in case, that is fine, but you cannot leave a runnable copy on the old system. Using the Windows Uninstall procedure, remove the programs, then manually remove any SOS folder that remains and empty the Recycle Bin. Here are the steps:
- In Windows XP: Click on Start > Settings > Control Panel > Add/Remove Programs.
In Windows Vista/7/8: Click on Start > Control Panel > Programs and Features.
- Scroll down in the box listing your software programs until you find the “SOS Applications”.
- Highlight and click on the Remove or Uninstall button (or Right-Click, then Uninstall).
- When you are asked if “you are sure you want to completely remove _____ and all its components” click Yes to All. If you are asked for any more verifications of your intention to remove all parts of the program, indicate “Yes”. When you have finished removing all the SOS applications, close the list window and close the Control Panel.
SOS Electronic Claims – ANSI Module for Emdeon tm
Filing claims electronically is designed to save you and your payers time and money. In order to make that happen, claims must meet certain standards. Paper filing is more forgiving than electronic filing can be; a human being is never involved in the electronic process, so you must be sure all the necessary information is there for a computer to process the claim. It is time to let your inner perfectionist come to the fore. Don’t worry about how you did it before. We are going to make sure that you know just what to do to get everything set up so your claims fly through the Emdeon tm system and on to your payers successfully!
This manual is provided to guide you through the process of enrollment, set up of SOS Office Manager and filing your electronic claims. Please work your way through it step-by-step so you complete all of the necessary information. If you do so carefully, you will successfully file electronic claims on your first try. If you rush through parts or skip other steps, your claims will be rejected. Use the checkboxes in each section of the manual when you have completed a particular task. Use the checklist on page 2 to make sure you have completed all parts of the process.
SOS will provide you with brief training videos to assist you in completing this process. Contact us with your email address so we can send you the training modules. Enjoy the process. Once you have completed the following steps, you will start to save significant amounts of time on filing claims. Then you will be able to spend your time collecting money rather than stuffing envelopes!
CHECKLIST
Use this checklist to make sure that you have completed all the necessary requirements to send claims electronically.
- Complete the Provider Agreement for Electronic Transactions via Emdeon tm and Enrollment Setup forms and fax to Linda at SOS, Inc. (888) 609-5514.
- Once the enrollment has been done, enroll for Emdeon Vision.
- Complete Payer Registration forms and mail to Emdeon tm as required.
- Download the newest release of OM and expansi.exe module.
- Enter the license information for the Electronic Claims module.
- Add the Emdeon tm Ansi module to your menu.
- Enter setup information in the ECM Setup screen in the Claim File Formatter.
- Make sure that all provider information has been entered: NPI, taxonomy code, SSN and/or tax id, and electronic provider number (site id).
- Make sure that all supplier information has been entered: NPI, and tax id.
- Enter the type of service code for all the service codes.
- Insurance Carriers – Enter NEIC/Payer number, Coverage type, insurance address (make sure that first line of address is entered), and carrier category.
- Referral Sources – Enter address, taxonomy and NPI. Facilities – Enter address and NPI.
- Activate the Claim Batch Warning and select the ones that pertain to your practice.
- Verify that you have done everything on your checklist. Once you have, contact Linda at SOS to setup an appointment for your first batch submission.
The Enrollment Process
Provider Enrollment
The first step to sending claims electronically is to complete the Emdeon Enrollment Forms. The faster the forms are completed and sent to the proper entities, the faster the approval will be.
- Complete one (1) Provider Agreement for Electronic Transactions via Emdeon for your organization. This document is a contract with SOS for filing claims through Emdeon tm. You will receive this as part of your purchase process and it must be completed and signed before proceeding.
- Register for Emdeon’s Vision Suite tool so you can track your claims status. Go to www.emdeon.com/signup to register. Emdeon tm will email a user id and password to you. You will need this information before we can help you send your first claims batch. If you file for multiple tax ids, please contact Linda at SOS for special instructions.
- Complete one (1) Emdeon Claims Provider Setup Form for each provider (need to say where the form is located). ***REMEMBER, IF YOU ADD PROVIDERS AT A LATER DATE YOU WILL NEED TO COMPLETE A FORM FOR EACH OF THEM AND SEND IT TO SOS BEFORE YOU CAN START SUBMITTING CLAIMS FOR THEM.***
- Complete the Emdeon Claims Provider Setup Form in this fashion:
- Section 1. Enter the information for your organization and each provider. Complete all fields.
- Section 2. This section is completed by SOS for you.
- Section 3. Enter your TSO (mailbox at Emdeon tm) if it has been previously assigned.
- Section 4. Enter the NEIC Payer ID for any insurance company that requires enrollment. To find these IDs and whether they require enrollment, go to www.emdeon.com. On the left side of the page under the heading Resources, click on Payer Lists. On the next page, under the heading Payer Lists, click Medical/Hospital/Dental Payers. This will bring you to a screen where you can search for your payers by name or by Payer ID number. To simplify your search results, set your filters so that Line of Business is Medical or Hospital; for Services choose Claims. Type the name of the insurance company in the Payer Name field and click View List. Be sure you are looking at the correct payer for Professional (M) or Institutional (H) claims. Check the Enroll column. If there is any letter except N, you must list this payer on your form by Payer ID.
- Fax the forms to Linda at (888)609-5514.
- You will receive an email from Emdeon tm to confirm the commercial setup which will give you the provider’s site id. You should then complete any necessary payer registration forms for carriers you entered in Section 4 above. The forms can be found at www.emdeon.com; on the left under Resources, click on the link for Enrollment Forms. On the next page, under the heading Enrollment Categories, click the appropriate link for either Professional Claim Payers or Institutional Claim Payers. Click the link for your payer to go to the page with the Enrollment form for the desired insurance company. Download the appropriate forms, complete the Emdeon tm cover sheet and payer document, and send all pages to Emdeon according to their instructions. DO NOT send the payer registration form to the payer unless specifically instructed to do so.
NOTE: Whenever you start filing for a new provider or a new tax id for an existing provider, complete an Emdeon Provider Setup Form (PSF) for that provider and fax it to SOS. Also if this provider has a different tax id then register this new tax ID for Emdeon’s Vision Suite by contacting Linda at (352) 242-9100 ext 1 or Linda@sosoft.com to provide your Vision user id.
ERA Enrollment
You will need to complete the ERA Provider Setup (need to say where it is available) Form for each tax id/billing NPI combination and fax back to me. You do not need a separate form for each provider if multiple providers file using the same tax id and billing NPI combination. Be sure to include your tax id as the Receiver ID and complete the appropriate information in Sec. 4 for the payers you are requesting. Please note that you must enroll for each payer for ERA if you want to receive ERA transactions. Information on whether a payer returns an ERA to Emdeon can be found by checking the Emdeon website and searching for the payer on the payer list. Go to www.emdeon.com; under Resources, click the link to Medical/Hopsital/Dental payers; from there you can search for your payer and see if ERA service is available.
IMPORTANT: Once the setup is complete, you will then need to submit to Emdeon the ERA payer registration forms that you can download from Emdeon’s website from Enrollment Forms>Professional ERA payers. You will not begin receiving ERA files from your payer until the approval process is complete.
Because the ERAs are electronic transactions that are processed through the Emdeon clearinghouse, there is a $0.15 charge for each transaction. After you begin receiving ERAs, you can view the payment information in Vision Suite on Emdeon’s website under the Payments tab using your current login user id.
If you want to download the ERAs and post payment in Office Manager from those ERAs you need to purchase the ERA Posting module from SOS. Please contact Trish at 352-242-9100 extension 1 or email her at Trish@sosoft.com.
System and File Requirements
- Windows XP, 2003 Server, Vista, or Win7.
- The current version of SOS Office Manager.
- A current Support/Update contract.
- The SOS ANSI claim formatter module for Emdeon tm with the license control number.
- Internet access with a DSL or other high speed internet access connection.
Download the current version of SOS and ANSI module
- You must install and patch the most recent version of the SOS Suite of products before you can start sending claims electronically. If you are not sure if you have the most current version go to our web site www.sosoft.com and click on Support > Download Files > Current Releases. (Under Current Releases, there is an option that will tell you ‘How to Check Your Software Version’.) This page will indicate the current release of our products. Depending on the version that you are running on your system, you may be able to download the update from the web site. If the version that you are currently using is too old you will need to call us to request a CD. Even after installing from a brand new CD, you will need to go to our web site to download any patch that has been posted.
- Once your SOS software is updated, you will need to download the latest version of the ANSI module. Even if you just updated SOS Office Manager or you just installed from a CD you may not have the latest version of the ANSI module. Go to our website. Click on Support > Download Files > Electronic Claims Formatter (expansi) for release xxxx.xx (this will be the same release number as your SOS Suite) to get the latest version. If you are working on a network, this file must be present in the SOS folder of all workstations that will be used to format and send electronic claim files to Emdeon tm.
- If you are running on a Windows 2003 Server and will be sending your claims through that server you will need to import the certificate for the curl program. To do this go to Start > Control Panel > Internet Options. Under Internet Options select the Content tab then click on Publishers under the Certificates section. Click on the Import button and follow the wizard. Under Browse go to your \SOS folder and select curl-ca- bundle.crt and install it as a Trusted Root Certification Authorities. In some cases you may find that you are not allowed to make any changes to the Internet Options. In that case notify your network administrator who will be able to make the changes for you.
The Setup Process
License the ANSI module
SOS will send you license information for the EXPANSIWMD product which you must add to the licensing data in your SOS database.
- Click on Start > Programs > SOS Applications > DBTools.
- Once DBTools is open, click on File > Licenses.
- In the Products window find the product labeled EXPANSIWMD.
- Highlight it and click on Change.
- Enter the licensee name and the control number as it appears on your license sheet.
- Click OK to Save.
- Exit DBTools.
Add the Emdeontm ANSI Module to your Menu
To see the module in you menu, you must add it to the list of options.
- Start OM.
- Select Bills/Claims > Create HCFA/CMS 1500 Claims.
- With your mouse pointer over the white area of this window, click with the RIGHT mouse button to display a popup menu.
- Left-click on Add.
- For Report Description type: ANSI – Emdeon
- For Command Line type: EXPANSI.EXE /WM /A1 /F2 /2310B /2000APRV /5
- Click OK to save.
Enter ECM Setup Information
Enter the setup information for the new module using the instructions below.
- Select Bills/Claims > Create HCFA/CMS 1500 Claims.
- Highlight ANSI – Emdeon tm on the list. Select Output Current Batch.
- OM will now invoke the Claim File Formatter – Emdeon tm program. The first time that you access the Claim File Formatter you will receive a message asking you if you want to copy an ECM Setup that is already entered or if you want to enter it yourself. In most cases you will enter the information yourself, so select NO. If you have already entered the information in your first dataset and you have other datasets to set up for your electronic claims submission you can choose YES and select the dataset to which you want to copy the information. Make sure that once the information is copied you go back into the ECM Setup to make any necessary changes.
- When the formatter comes onto the screen, select ECM Setup on the main menu, then select the Setup Information tab.
- At the Name to use for claim file type: CLAIMEMD.DAT
- Check the field Create a ZIP claim file.
- Enter the number 29 in the Maximum number of detail records field.
- Enter the ITS Login ID and ITS Password that was provided to you by SOS. Check the Submit claims via Emdeon website box. If you do not have this information yet, you can enter it when you receive it.
- Check the Check if the transmit file matches the Current Batch box.
- Leave the Set the “Go to web site” button on Main screen to this web address field blank.
- Go to the Submitter Tab.
- Check the appropriate box for the Submitter is field. If you are submitting for a provider, select Person and if you are submitting as an organization select Organization.
- Click on PROD for the Test/Production Indicator.
- Enter the Submitter information. If you have selected Person in step 12, make sure that you enter the last name of the provider in the Submitter Name field and the first name of the provider in the First field. If you have selected Organization then enter the organization’s name under the Submitter Name field. Enter the address, street, city, state, zip, contact name, phone, fax and e-mail.
- Go to the Receiver/Misc Tab.
- Leave the box unchecked for Ack. Requested (ISA14) field.
- Put 00 (these are zeros and not the letter O) in the Auth. Information Type (ISA01) field.
- Leave the Auth. Information (ISA02) field blank.
- Put 00 (these are zeros and not the letter O) in the Security Information Type (ISA03) field.
- Leave the Security Information (ISA04) field blank.
- Under the Billing Service Info tab leave all the fields blank unless you are a billing service. If you are unsure please give SOS a call.
- Click OK to save.
- Click on Exit Program.
Add Supplementary Information to OM Data Files
Using the ANSI module to submit Emdeon tm claims requires that certain additional information be added to your existing OM data. The necessary additions are detailed in the following sections.
System Setup
System Setup in OM controls a variety of data entry defaults, i.e. the data that appears automatically. Making entries here will not change data that is already entered, but it will control what appears for new patients. Make sure that you go through every item on every tab of the Setup form (Setup > System Options), entering the appropriate default information.
Patient Information
- Click on File > Active Patients or on the Active Patient List icon.
- Be sure to enter complete address, date of birth and insurance ID information for each patient and for the insured.
- Assure that Intake date is the date the patient was actually first seen and is not a default date supplied by OM on the day you entered the patient information (Active Patient > highlight the patient and click Edit > Additional tab).
- Make sure your Policy information for the patient is correct and complete.
- Be sure that the CSU/1500 information contains the Date of the Current Illness and that this date precedes the Intake Date, the Admission Date and the Date of Service. Make sure you have an ICD diagnosis entered.
Providers
There are several changes that must be made to provider information. Go to Lookups > Providers.
- General tab: in the Title field enter the provider’s title (e.g. MD, PhD, LCSW, CISW, etc). Leave out punctuation and spaces.
- General tab: in the Specialty/Taxonomy Code field enter the appropriate taxonomy code for this provider’s specialty. You can find a list of Taxonomy codes at the following address: http://www.wpc-edi.com/codes/taxonomy
RAM
If you call SOS with a complaint about software performance, the first thing a technician will check is the amount of RAM you have configured for the database to use for cache. The larger your cache, the more of your database that can be copied from the relatively slow hard drive to much faster RAM memory, and the faster your database can respond to the software’s requests for data. Insufficient cache because of too little physical RAM in the computer or because of a simple configuration oversight can be deadly, especially for reporting.
CPU
Everyone has had the experience of standing in a long line at a supermarket because there was only one cashier on duty. In most cases, at some point a manager will notice the log-jam and open additional registers. Waiting shoppers quickly spread out among the new cashiers, and in short order the situation is resolved. New shoppers arriving at check-out have little or no wait.
A very similar thing can happen with your SOS database server. Retrieving, adding, updating, and deleting data in SOS all take the form of database queries or commands. Each must be executed in turn, and the execution of these commands requires computing resources – specifically memory and CPU resources — on the server computer.
Recently SOS technicians received a couple of calls from customers who were experiencing poor performance in SOS. In both cases they discovered that the customers had adequate RAM but just one CPU core available on the database server to handle the work being sent to it by between 9 and 30 users. It was therefore no surprise that reports were taking “forever” to run, and that users were complaining about getting “locked up”. In that situation, frustrated users often resort to drastic measures, like rebooting their computers or force-stopping SOS while it is waiting to complete some process that has not run to completion. That just adds to the problem because the database must now also clean up the mess left by the rebooting users. The single CPU core is similar to the one cashier in the supermarket. He or she may be working at top speed, but to the person at the end of the line, it feels like nothing is happening.
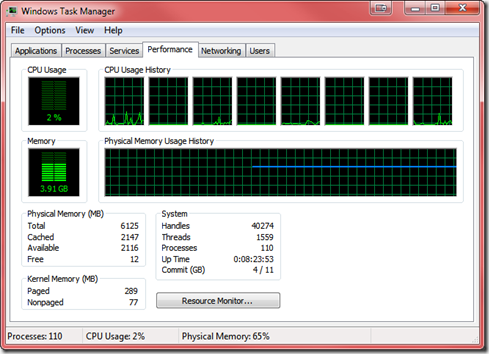
For the store, the solution is to add more cashiers. For your SOS database, the solution is to move the database to a computer with more CPU cores. Fortunately, modern computers, even relatively inexpensive ones, typically have at least two to four core CPU’s. More and more frequently you will find computers with advanced processors that allow six or eight processor paths, even if there are only three or four actual CPU cores. The Intel Core i7, for example, is a high-performance, quad-core processor found in many computers in the $700 to $1,000 range, but which provides software with eight parallel execution pathways. In an environment of that kind, thirty to fifty users will rarely find themselves waiting around for very long!
In the screenshot below, showing the Performance tab of Windows Task Manager, you can see the eight parallel processing paths available on an Intel Core i7 CPU:
How Do I Know If I Have One of These Issues?
There is a quick and easy way to check your cache and CPU situation. From the top menu in OM or CM select Help > Version Information, then click the DB tab.
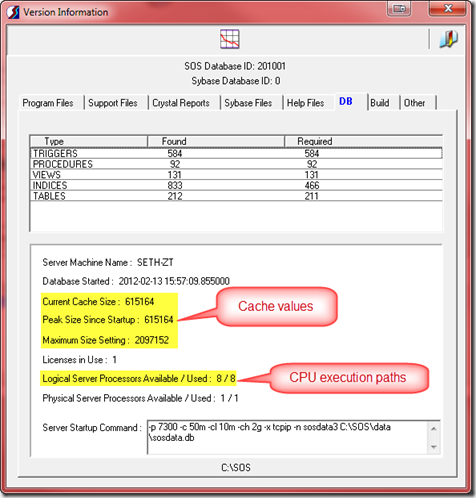
Examine the cache values (best done at the end of a busy day). If the peak size is less than the maximum size setting, you have ample cache, at least for now. If the numbers are the same, then it is likely that you would benefit from adding more cache, either by increasing the maximum size setting in your SERVER.PRM file, or if necessary, by adding more RAM to your system (if possible). For more detail about cache settings, see http://www.sosoft.com/fod/doc435-enhancing_perf_large_db.pdf
To see how many CPU execution pathways are available in your computer, check the “Logical Server Processors Available” line. If you see “1/1” here and you have more than two people on your system, you are going to really suffer. Even one person running a standalone copy of SOS can encounter issues in that situation and would see much better computer performance across the board by upgrading to at least a dual-core computer.
Some settings make use of virtual servers that can be configured to use a specified number of the host computer’s CPU cores. Often the default setting for virtual machines is just one processor core, even when the host system has four or more available. If your database is running on a virtual server and SOS shows “1/1” Logical Processors Available, you should adjust the virtual machine settings to allow it to use more of the host computer’s cores.
Database Settings Can Make a Difference
There are two internal database options that can make a significant difference in performance: max_query_tasks and optimization_goal. In most cases, the former should be set to 1, and the latter to “All-rows”. To determine your own settings, check in Reports > Other Reports in OM to see if you have the report “Database Performance Options”. If not, you can download it from here: http://www.sosoft.com/files/downloads/dbperfopts.rpt and install it in the Other Reports menu using these instructions: http://www.sosoft.com/fod/doc474-adding_new_report.pdf.
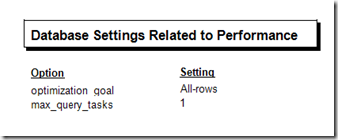
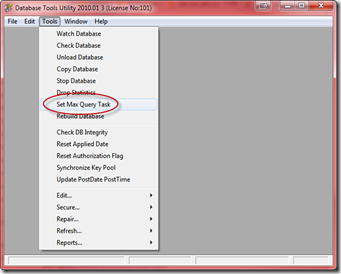
If max_query_tasks is not set to 1, you can change it using a tool on the tools menu in DBA Utilities. Using an SOS login with security administrator rights, click the Admin icon on the login window, then go to Database Tools > DBA Utilities. Click Set Max Query Task. That item is a toggle that switches the setting back and forth between 0 and 1. When set to 1 it should display a checkmark next to the menu item, but it is a good idea to confirm the setting with the report and re-toggle if it is not set as you wish.
There is no utility to reset optimization_goal, but an SOS support tech can establish a remote connection to your system and reset it for you.
Consider a Server that is not a Server
One thing that is important to understand is that it is not necessary to run the database on a computer that says “server” on the box, nor is it necessary to have Windows Server xxxx as the operating system on your SOS database computer. For example, instead of adding an official “server,” you can add a computer running Windows 7 Pro on an Intel Core i7 or similar CPU to your network, install a copy of SOS using the “server” option, move your database over, and fire it up. Remember that it is not recommended that you map the database server’s SOS folder as a network share, so Microsoft’s 10 user limit on non-server versions of Windows is not an issue. Database access over the network is not done with Windows shares and therefore does not count against that limit. You can therefore have dozens of users on the database even though it is running on Windows 7 rather than Server.When upgrading a server is not a possibility for one reason or another, this approach can provide the same results for a fraction of the cost.
Note that if you plan to use your server as both the database server and a terminal server, then you must run a Windows Server operating system (such as Windows Server 2008, or Server 2008 R2). You cannot use Windows 7 as a terminal server.
This document presents a sample query that, when run using the SOS-supplied DBISQL utility, produces an EXCEL file that can be used as the data to produce a set of mailing labels in MS Word. There is a document on the SOS web site that describes how to run queries:
http://www.sosoft.com/queries/how2010/
Specifically, it selects from the main data set (licnum = 101), only certain primary providers, and only those with a non-zero service within the last 270 days. The results of the query are saved in a file called LABELS.HTML in the SOS folder on the C: drive (see last line of the query). You can copy and paste the query below directly into DBISQL, then make any changes you like before running it.
SELECT
TRIM(a.firstname) AS “First Name”,
TRIM(a.lastname) AS “Last Name”,
a.addr1 AS “Address 1”,
a.addr2 AS “Address 2”,
TRIM(city) AS “City”,
TRIM(state) AS “State”,
zip
FROM
rv_patients a
JOIN ptvars b ON a.ptnum = b.ptnum
WHERE
a.licnum = 101
AND a.priprvcode IN (‘AB’,’CD’,’EF’,’GH’)
AND b.lfeedate > (TODAY() – 270)
ORDER BY
a.lastname, a.firstname
;
OUTPUT TO c:\sos\labels.html FORMAT HTML
Once you have run your query successfully, open the resulting XLS file in MS EXCEL and re-save it. That will put it into the file format that your particular version of MS Word likes best. Now open your web browser and go to:
http://www.sosoft.com/files/tv/other/querylabelmerge.swf
to view a short Flash video that demonstrates how to create your labels using the output of your query. Depending on the speed of your internet connection, the video may take a while to load. (If you don’t have the Flash add-in installed, your browser will probably offer to download and install it for
you.)
Normally when you open the DBISQL query utility, you must provide your SOS User ID, your password, and select the data source:
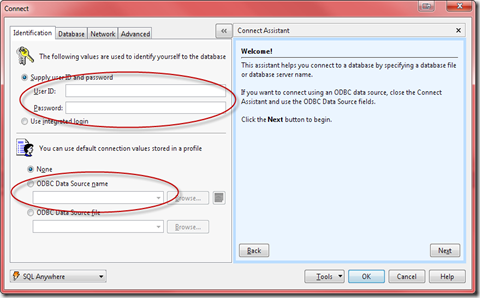
Because of the potential security risk, you would not want to default values for your ID and password, but it would be a convenience if there were a way to automatically select the SOSDATA data source. Very few SOS users would have any reason to select anything else for that field.
It turns out that you can specify the data source when DBISQL is launched, sparing you the need to enter it every time. Here is how it is done. (The images below are from Windows 7, but the same steps will work in Windows XP):
- Find the shortcut in your Windows Start menu for DBISQL. Normally you would find it at Start > Programs > SOS Applications.
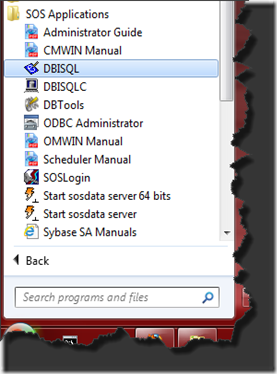
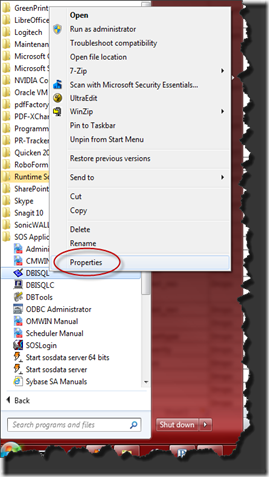
- RIGHT-click the DBISQL shortcut to open the context menu, then LEFT-click Properties at the bottom of the menu to open the Properties window:
- In the Properties window you will see the Command Line that Windows uses to launch the program. Simply add –c "dsn=sosdata" to the end of that line. When you are finished it will look like this:

- Now just click OK to save. If you have a shortcut pinned to your Start menu or on your desktop, you can go through exactly the same steps to change those as well.
The following is a further elaboration of the feature documented in the First Contact User Guide, in the FCConfig – Field Selection and Options section.
In that section there is a discussion about changing text entry fields to droplists that are populated with selections you maintain from the My Lists screen in First Contact. It mentions that in some cases a field that is initially a te (text) type, can be changed to a drop or combo type, linked to a user-specified list. A drop field type is one where the user must select an option from a fixed list of choices. A combo field type is like a drop, except that it also permits the user to type in something new that does not appear in the list.
The first step is to consult with an SOS tech support rep to see if the field you would like to change to a list-linked drop or combo is eligible for such a modification. If it is, the tech will use a special program to modify the field type for you, using a remote support utility.
The next step will be to create the list containing the desired selections you want to appear for that field:
- Open First Contact and click the My Lists icon at the top of the screen.
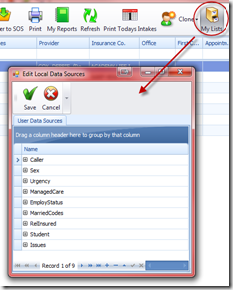
- At the very bottom of the Lists window, notice a bar with small buttons. Click the plus sign to add a new list:

- An empty row will appear in the My Lists window. Type in your new list name, which should be unique and contain neither spaces nor punctuation, then press the ENTER key on your keyboard:
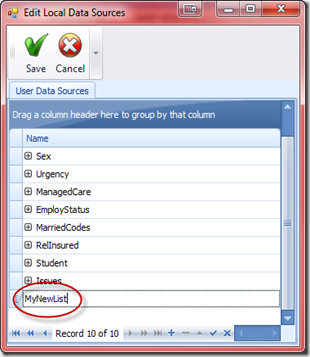
- Click the Save button at the top of the window.
- Now that your list has been created, you can add the desired items to the list. Click the My Lists button to re-open the My Lists window.
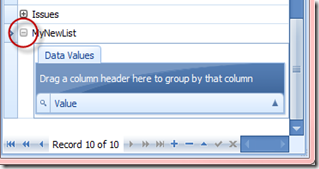
- Click the little plus icon just to the left of the name of your new list. A "Data Values" panel will open below it:
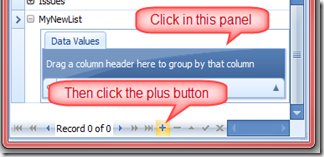
- Make sure that the Data Values panel is selected by clicking anywhere within it, then click the little plus button at the bottom of the window:
- An empty row will appear in the Data Values panel. Type the first item for your pick-list, then press ENTER on your keyboard.
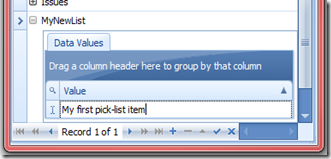
- Repeat steps 7 and 8 until you have entered all the desired items for your list. If it takes more than a few minutes, consider clicking the Save button at the top of the window so that your new entries are saved, then re-open My Lists and add some more. Your new items are not permanent until the Save button is executed.
Modifying and Deleting Existing Items
From time to time you may want to modify or remove items from a list. To do so:
- Open My Lists as in step one above.
- Click the little plus box to the left of the list you would like to maintain. The Data Values panel will open, showing the items on your list.
- To change an item, just click anywhere in the item’s current text, make your changes, and press the ENTER key on your keyboard.
- To remove an item, click the ">" icon just to the left of the item to select it, then click the small minus button at the bottom of the window:
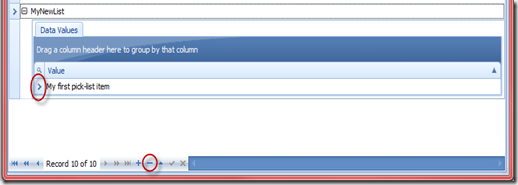
- When you have completed your changes to the list, be sure to click the Save button at the top of the My Lists window.
Linking Your New List to a Field in Your Screen Form
Now that you have your list, there is one more thing to do – linking it to the field that your SOS support tech converted from a plain text field to a drop or combo field.
- If you have First Contact running, exit out.
- Open the FCConfig utility by clicking your Windows Start button, then Programs, then the First Contact 2010.x.x (the number depending on the version installed).
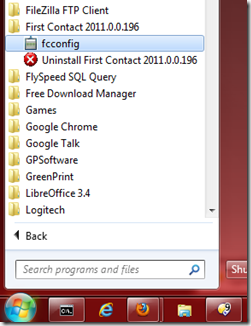
- Let us assume that the FC field you are converting to use your list is User_StrField1. Find that field in the Field Name column, and click it to select. (Hint: Click the column title to sort the list alphabetically.)
- Click the Pencil icon in the toolbar at the top of the window to modify the field configuration.
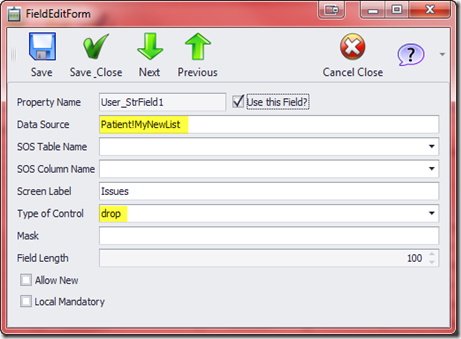
- In the Data Source field type Patient!MyNewList, replacing "MyNewList" with the name of the list you just created in First Contact. Make sure that you include the exclamation mark between "Patient" and the name of your list.
- Check that it says "drop" or "combo" next to Type of Control. If not, select the correct type from the drop list, or type it in, being careful to type all lower case characters.
- Click the Save_Close icon at the top of the window, then, back on the field list, click Save again to finalize your changes and close FCConfig.
- You can now return to First Contact to test your new pick-list field.
At times it is desirable to batch claims according to a particular payor or payors. Examples include:
- Generating a batch of Medicare paper claims using the Medicare-specific formats.
- Generating electronic claim submission files for just selected payors.
The most efficient way to proceed is by using the Carrier Category setting on the Additional tab of your Carrier/Plan form (Lookups > Insurance Carriers/Plans).
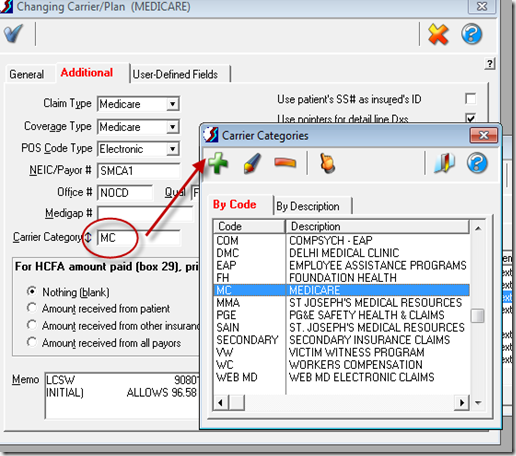
Create and assign the same Carrier Category to each of the Carrier/Plans that you want to group together for insurance claim runs.
When it comes time to generate insurance, just specify the desired Carrier Category in the batch options to create a batch that contains only claims for those payors assigned to the specified category:
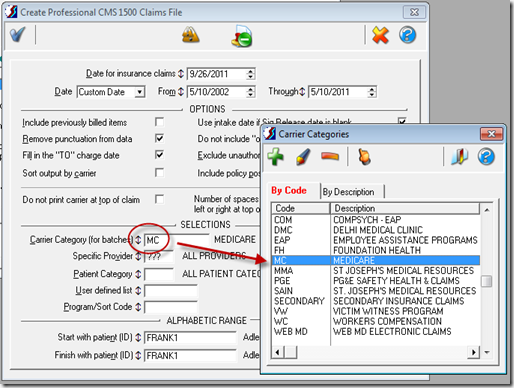
Note that even a blank category field is significant. If you have assigned certain payors to a category, they will not be included in the batch if you leave the batch option for Carrier Category blank. That is, a blank Carrier Category will match only those payors with no category selected on the Additional tab.
At times it is desirable to have the same detail description in several Treatment Plan classes. For example, let’s say that you have created a detail for the specific symptom "sleep difficulties" in the Problem class "Depression". This symptom is common to many problems, so SOS provides a quick way to copy the new detail to other relevant classes.
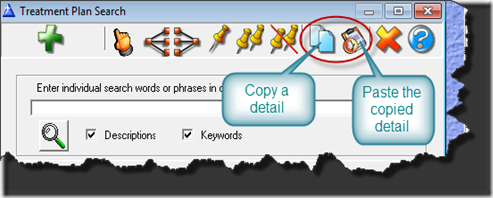
- Open the Treatment Plan Search window by highlighting the appropriate section heading (ie: Problems, Goals, Assets, Obstacles, or Interventions) in an existing treatment plan, then click the Add (green plus) icon in the toolbar.
- Click the magnifying glass icon to display the entire list of classes and details in the section.
- Navigate to the class that already includes the detail you want to copy. In our example, it would be the (Problem) "Depression" class, under which you would see "sleep difficulties."
- Highlight "sleep difficulties" and click the Copy (two sheet of paper) icon on the toolbar. Alternatively, you can simply press the standard Windows key combination for "copy", <CTRL> and <C> on your keyboard.
- Now highlight a different class that should also include the "sleep difficulties" detail. Click the Paste (clipboard) icon on the toolbar, or use the Windows paste key combination, <CTRL> plus <V>.
While secure email systems are available to send documents containing Protected Health Information (PHI), most regular email transmissions can be intercepted and viewed by parties other than the intended recipient. For this reason, it is a best practice to send such documents as encrypted, password-protected, PDF files.
When viewing an intake form in First Contact, you will notice that there is an icon in the toolbar with the caption "Email Provider".

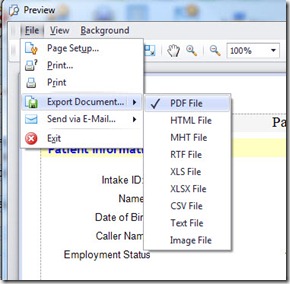
Clicking that icon generates a report in the same format as the screen display, which displays in a report preview window. Either click File > Export Document > PDF…
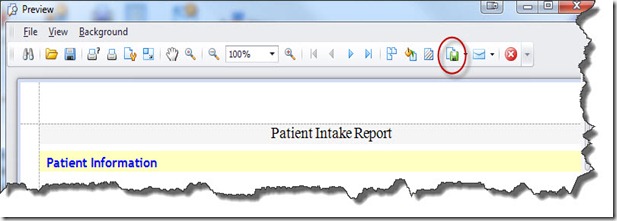
… or click the Export Document icon on the toolbar.
In the Export Options window, click the field next to Password Security. Another window will open. Check the first box to Require a password to open the document and type the desired password in the indicated field. When you click OK at the bottom of that window, a confirmation box will appear. Re-type the password and click OK. That window will close and you will be back at the Export Options. Click OK there, then enter the desired location and name for the protected PDF file. Take note of this information. You will need it in order to attach the file to your email.
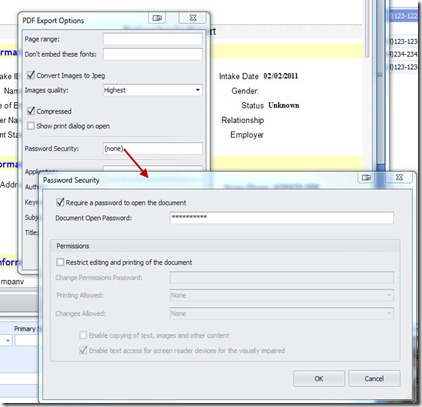
You will find yourself back at the report preview window. Just close that window with the X icon.
Open your email application, create your message and attach the document you just created. If you have not pre-shared the document password with the recipient, then you should send it separately via fax or phone. Do not include it in the body of email, as that would defeat the whole purpose of encrypting the document. Sending the password in a second email is almost as insecure. If you will be sending documents to this recipient on a regular basis, it is probably best to establish a standard password that you will use for that purpose and share it with the recipient beforehand.
A Microsoft Linked Server can be created that uses the SQL Anywhere OLE DB provider to obtain access to a SQL Anywhere database. SQL queries can be issued using either Microsoft’s 4-part table referencing syntax or Microsoft’s OPENQUERY SQL function. An example of the 4-part syntax follows.
SELECT * FROM SOSDATA..SOS.Patients
In this example, SOSDATA is the name of the Linked Server, SOS is the table owner in the SQL Anywhere database, and Patients is the table name in the SQL Anywhere database. The catalog name is omitted (as indicated by two consecutive dots) since catalog names are not a feature of SQL Anywhere databases.
The other form uses Microsoft’s OPENQUERY function.
SELECT * FROM OPENQUERY(SOSDATA, ‘SELECT * FROM Patients’)
In the OPENQUERY syntax, the second SELECT statement (‘SELECT * FROM Patients’) is passed to the SQL Anywhere server for execution.
To set up a Linked Server that uses the SQL Anywhere OLE DB provider, a few steps must be followed.
To set up a Linked Server in SQL Server 2005 or 2008
- Open up SQL Server Management Studio.
- In the pane on the left, open Server Objects.
- Under Server Objects, open Providers. If you have SOS installed on this server, there should be a provider named "SAOLEDB11". If not, install SOS on the server, taking care to select the "Client" option (because obviously there is a different computer hosting the SOS database and we will be connecting to it as a client). Restart SQL Server Management Studio to see if the driver now appears under Providers. If not, you will have to manually register the appropriate DLLs as follows.
If you are running 32 bit SQL Server, open a command window and type the following, making appropriate adjustments in the location of the SOS folder:
REGSVR32 C:\SOS\SA\BIN32\DBOLEDB11.DLL <press enter>
REGSVR32 C:\SOS\SA\BIN32\DBOLEDBA11.DLL <press enter>
If you are running 64 bit SQL Server, open a command window and type the following, making appropriate adjustments in the location of the SOS folder:
REGSVR32 C:\SOS\SA\BIN64\DBOLEDB11.DLL <press enter>
REGSVR32 C:\SOS\SA\BIN64\DBOLEDBA11.DLL <press enter>
Again, restart SQL Server Management Studio to refresh. The SAOLEDB11 provider should now appear in the Providers list.
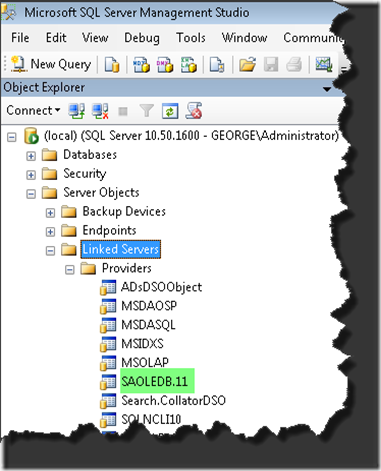
- Right-click on Linked Servers and select "New Linked Server".
- Fill in the General page like this:

The Provider string is the connection string. Include the user id (uid), password (pwd), engine, aka server name (eng), the network protocol (links), and for good measure, the ip address of the computer on which the database is running as a parameter after the links specification. Here is an example:
uid=myid; pwd=mypwd; eng=sosdata; links=tcpip(HOST=1.2.3.4)
-
The "Linked server" field on the General page should contain a Linked Server name in the first field (like SOSDATA used above). The "Other data source" option should be selected and "SQL Anywhere OLE DB Provider" should be selected from the list. The "Product name" field should contain an ODBC data source name (for example, SOSDATA). The "Provider string" field should contain additional connection parameters including user ID, password, engine, and links. Other fields, such as Data source, Location, and Catalog on the General page should be left empty.
-
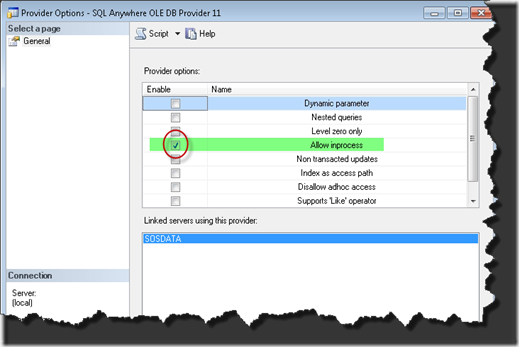
Select the "Allow inprocess" provider option.
Right-click the SAOLEDB.11 provider in Providers list beneath Linked Servers and select Properties. Check the Allow inprocess option. If the InProcess option is not selected, queries will fail. Save.
-
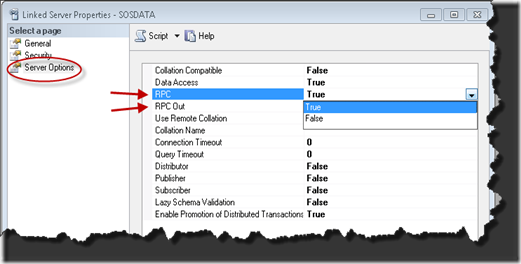
Select the "RPC" and "RPC Out" options.
Right-click your new Linked Server in the left pane under Linked Servers and select Properties. These options are True / False settings. Make sure that they are set True. The Remote Procedure Call (RPC) options must be selected if you wish to execute stored procedure / function calls in a SQL Anywhere database and pass parameters in and out successfully.
You should now be able to query tables in SOSDATA using the techniques described at the top of this article.
|
|


 Print Friendly


