A Microsoft Linked Server can be created that uses the SQL Anywhere OLE DB provider to obtain access to a SQL Anywhere database. SQL queries can be issued using either Microsoft’s 4-part table referencing syntax or Microsoft’s OPENQUERY SQL function. An example of the 4-part syntax follows.
SELECT * FROM SOSDATA..SOS.Patients
In this example, SOSDATA is the name of the Linked Server, SOS is the table owner in the SQL Anywhere database, and Patients is the table name in the SQL Anywhere database. The catalog name is omitted (as indicated by two consecutive dots) since catalog names are not a feature of SQL Anywhere databases.
The other form uses Microsoft’s OPENQUERY function.
SELECT * FROM OPENQUERY(SOSDATA, ‘SELECT * FROM Patients’)
In the OPENQUERY syntax, the second SELECT statement (‘SELECT * FROM Patients’) is passed to the SQL Anywhere server for execution.
To set up a Linked Server that uses the SQL Anywhere OLE DB provider, a few steps must be followed.
To set up a Linked Server in SQL Server 2005 or 2008
- Open up SQL Server Management Studio.
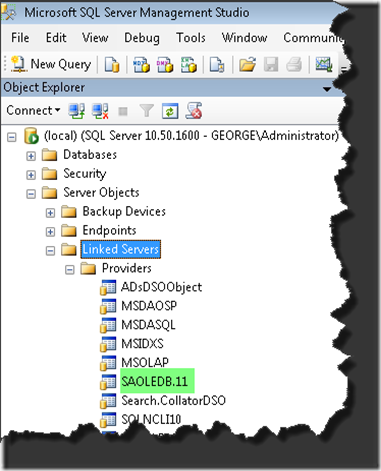
- In the pane on the left, open Server Objects.
- Under Server Objects, open Providers. If you have SOS installed on this server, there should be a provider named "SAOLEDB11". If not, install SOS on the server, taking care to select the "Client" option (because obviously there is a different computer hosting the SOS database and we will be connecting to it as a client). Restart SQL Server Management Studio to see if the driver now appears under Providers. If not, you will have to manually register the appropriate DLLs as follows.
If you are running 32 bit SQL Server, open a command window and type the following, making appropriate adjustments in the location of the SOS folder:
REGSVR32 C:\SOS\SA\BIN32\DBOLEDB11.DLL <press enter>
REGSVR32 C:\SOS\SA\BIN32\DBOLEDBA11.DLL <press enter>If you are running 64 bit SQL Server, open a command window and type the following, making appropriate adjustments in the location of the SOS folder:
REGSVR32 C:\SOS\SA\BIN64\DBOLEDB11.DLL <press enter>
REGSVR32 C:\SOS\SA\BIN64\DBOLEDBA11.DLL <press enter>Again, restart SQL Server Management Studio to refresh. The SAOLEDB11 provider should now appear in the Providers list.
- Right-click on Linked Servers and select "New Linked Server".
- Fill in the General page like this:
The Provider string is the connection string. Include the user id (uid), password (pwd), engine, aka server name (eng), the network protocol (links), and for good measure, the ip address of the computer on which the database is running as a parameter after the links specification. Here is an example:
uid=myid; pwd=mypwd; eng=sosdata; links=tcpip(HOST=1.2.3.4) -
The "Linked server" field on the General page should contain a Linked Server name in the first field (like SOSDATA used above). The "Other data source" option should be selected and "SQL Anywhere OLE DB Provider" should be selected from the list. The "Product name" field should contain an ODBC data source name (for example, SOSDATA). The "Provider string" field should contain additional connection parameters including user ID, password, engine, and links. Other fields, such as Data source, Location, and Catalog on the General page should be left empty.
-
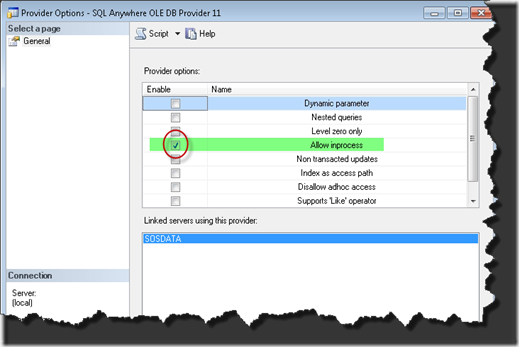
Select the "Allow inprocess" provider option.
Right-click the SAOLEDB.11 provider in Providers list beneath Linked Servers and select Properties. Check the Allow inprocess option. If the InProcess option is not selected, queries will fail. Save.
-
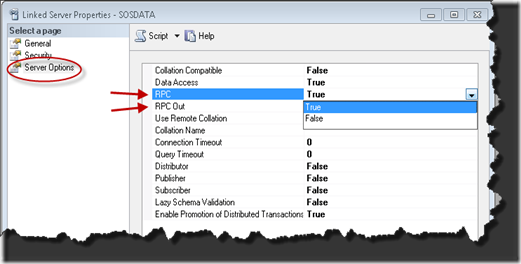
Select the "RPC" and "RPC Out" options.
Right-click your new Linked Server in the left pane under Linked Servers and select Properties. These options are True / False settings. Make sure that they are set True. The Remote Procedure Call (RPC) options must be selected if you wish to execute stored procedure / function calls in a SQL Anywhere database and pass parameters in and out successfully.
You should now be able to query tables in SOSDATA using the techniques described at the top of this article.


 Print Friendly
Leave a Reply
You must be logged in to post a comment.